

Using the canvas element
I had such high expectations when I started creating a business card creator with JavaScript.
In my mind, I thought converting a section of HTML into a PNG file would be simple.
It was a struggle as I realized I'd have to draw the designs I wanted right on the canvas element.
This is where things really got tedious because I needed to manipulate the canvas, set the width, apply different styles on the canvas, among other set ups.
Learn more about the canvas element here
Now, my interest in web development lies more on the logic, than the design part.
At the moment, there is no function that allows one to convert a part of an html markup apart from the canvas element.
Which is why I was ecstatic to discover the html2canvas library.
Its role is simple, the library allows you to take a snapshot of any section you indicated and you can convert it to a PNG file. Without manually setting up the canvas element.
Best part, the dependencies doesn't take up as much space
**Let's work on a real life project with this. **
For this, our goal is to convert this business card to a PNG file.
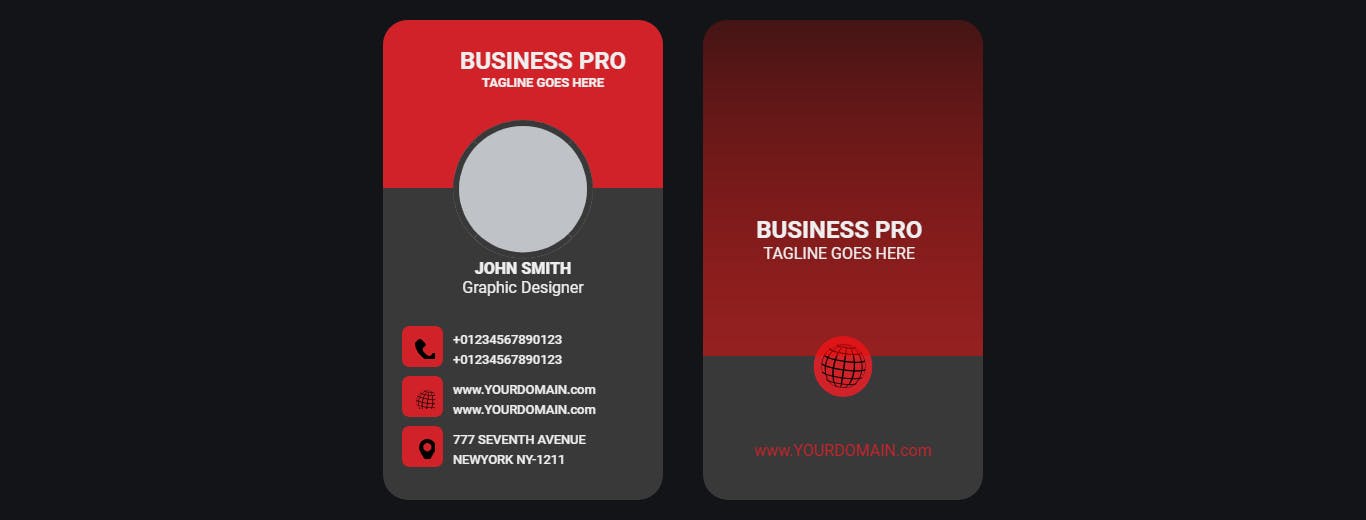
And to get to the crux of the matter, I'll be using this codepen design from Mohcine Dev
So, you can get the html and css from this codepen: codepen.io/MohcineDev/pen/vYXeqZm
You just need to wrap the html file inside an article element. Then, we need a button outside the article container -
So, your html file should end up like this 👇👇
<!DOCTYPE html>
<html lang="en">
  <head>
    <meta charset="UTF-8" />
    <meta http-equiv="X-UA-Compatible" content="IE=edge" />
    <meta name="viewport" content="width=device-width, initial-scale=1.0" />
    <link rel="stylesheet" href="/css/form.css" />
    <title>html2canvas library</title>
  </head>
  <body>
    <!-- Canvas -->
    <article id="card-container">
     <!-- HTML from https://codepen.io/MohcineDev/pen/vYXeqZm -->
    </article>

    <section class="down-button">
      <button class="download-card" id="download-card-btn">
        Download card
      </button>
      <a href="#" id="download-link" download="MyBusinessCard.png"></a>
    </section>
    <script src="https://html2canvas.hertzen.com/dist/html2canvas.min.js"></script>
    <script src="/main.js"></script>
  </body>
</html>
For the CSS file, you can also use the same codepen
And use the below CSS for the button section
#download-card-btn {
  padding: 15px;
  border-radius: 5px;
  cursor: pointer;
  font-size: 1rem;
  font-weight: 600;
  width: 40%;
  background-color: black;
  border: none;
  color: white;
  margin-top: 20px;
  margin-bottom: 20px;
  cursor: pointer;
}

#download-card-btn {
  margin-left: 20px;
  width: 180px;
}

#download-card-btn:hover {
  transition: 0.5s ease-in;
  opacity: 0.7;
  transform: scale(1);
}
Installing html2canvas library
With HTML Canvas, it's quite simple
You can install html 2canvas as an npm package, or just add the script element on your html file
If you are conversant with npm, you simply need to run the following on your terminal npm install --save html2canvas
But for the purposes of this project, we'll just use the script link already in the html file
<script src="https://html2canvas.hertzen.com/dist/html2canvas.min.js"></script>
Step 1 - Setting up the project
As seen in our html file, we'd want to convert the container to PNG file
Usually, you'd have to create a new canvas. Then draw the designs right on the canvas
However, for front-end developers like me who prefer the logic side of development to the design, html2canvas is a lifesaver.
Now, to get to the nitty gritty.
This is the business card on a webpage.
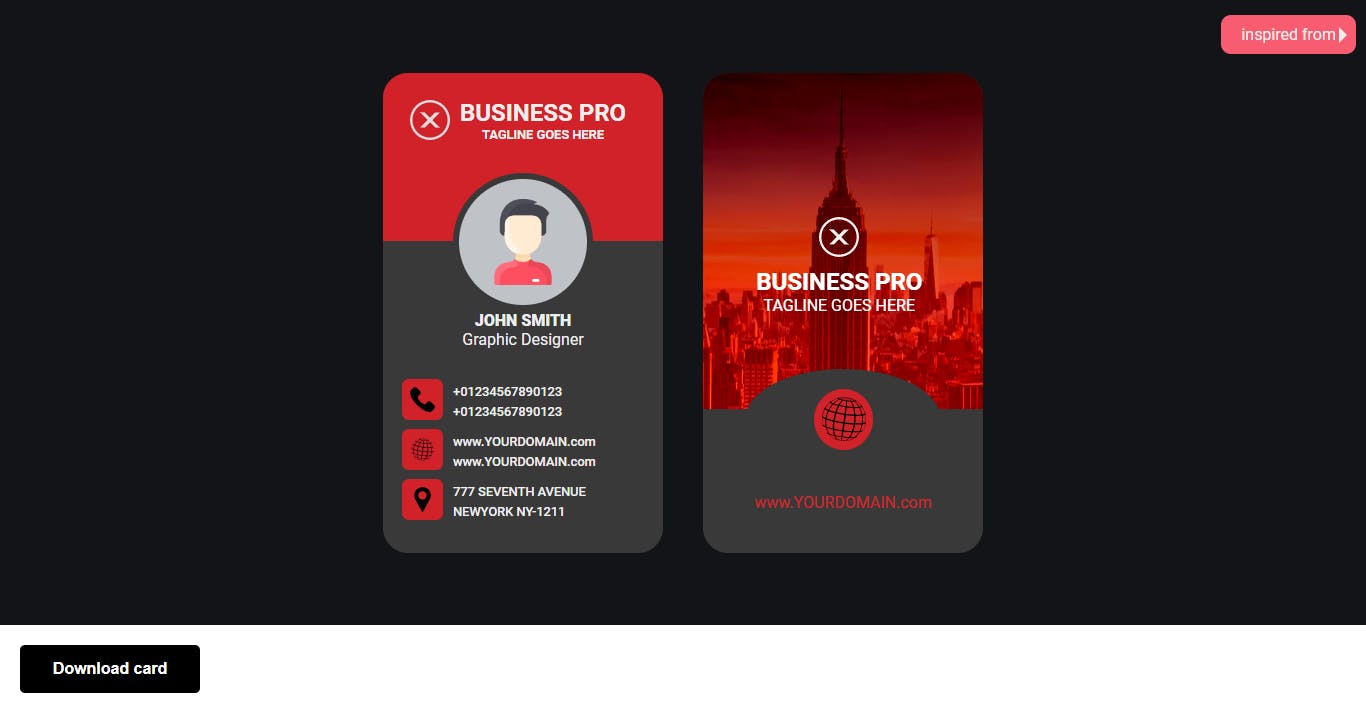
Our goal is this... when the download Card button is clicked, we want to download the front part of the business card.
So how do we go about this?
In the HTML markup, you just need to add an id named "card-container-front" to the div with the front class as seen below

So that's the section we want to convert to PNG
Now, in your JavaScript file.
Step 2 - Selecting global variables and setting event listeners
Let's select the button and save to a new variable -
const downloadCard= document.querySelector('.download-card')
Then, we just need to add an event listener to the button, so that when we click on it, the card gets downloaded.
downloadCard.addEventListener("click", () => {
  // code goes here
});
Step 3 - Implementing the html2canvas library
Moving on, this is the time to call on the html2canvas library
The syntax goes thus 👇
html2canvas (areaToBeScreenshotted).then(canvas)=>{
// convert to PNG file here
}
Remember, html2canvas accepts a parameter which is the section you want to take a snapshot of.
So, we'll just select the element from the html file using the DOM querySelector.
html2canvas (document.querySelector("#card-container-front"))
After this, we pass a canvas parameter for the .then() function.
This canvas serves as a placeholder for the element selected on the html2canvas parameter
Note that the parameter for the html2canvas can be any part of your html markup.
So the html2canvas library function should look like this 👇
downloadCard.addEventListener("click", () => {
html2canvas (document.querySelector("#card-container-front")).then((canvas) => {
  // Rest of code goes here
});
Still within the html2canvas library function...
The next thing to do is select the download link to make the canvas downloadable.
Remember, you have an anchor tag in the html file saved under -
<a href="#" id="download-link" download="MyBusinessCard.png"></a>
So let's select that and save it under downloadLink variable
let downloadLink = document.getElementById("download-link");
Now, we can convert the canvas to the toDataURL() method.
downloadLink.href = canvas.toDataURL();
According to MDN, the toDataURL() method returns a data URL containing a representation of the image in the format specified by the type parameter.
If nothing is specified, it returns the image/png format. Read more about toDataURL method here
Now, we can assign this URL to the downloadLink href. Then use the click() method to simulate the click event on the converted canvas
downloadLink.click()
Your JavaScript file should end up like this
const downloadCard = document.querySelector(".download-card");

downloadCard.addEventListener("click", () => {
  html2canvas (document.querySelector("#card-container-front")).then((canvas) => {
    let downloadLink = document.getElementById("download-link");
    downloadLink.href = canvas.toDataURL();
    downloadLink.click();
  });
});
Now, when you click on the downloadCard button, you can successfully download any specified section of your page.
As seen below.

And that's it.