

How I managed to escape tutorial hell with these 2 practical process. No fluff


Table of contents
- Introduction
- Step 1. - Knowing the concept to use
- Step 2. - Using the right operator
- Step 3. - Conditionals
- Step 4. - if/else statements
- Step 5. - Execute the program
- How about manipulating the DOM?
- FIRST STAGE - Accessing the Form
- SECOND STAGE - Adding Event listeners
- THIRD STAGE - Functionality of the code
- Going a step further
- Conclusion
Introduction
Being able to cross the bridge from tutorial hell to programming Independently is probably the biggest hindrance for a newbie
Now, as someone who started learning JavaScript in February, I felt stuck when after 4 months, I still couldn't make a guessing game.
Which is why I promise that this article will be as detailed as possible
What you're about to read will help you finally start solving coding exercises and coding without smacking your head against the wall.
So, every newbie coder experiences this:
After taking tutorials, you're actively learning about the syntaxes in a particular language. If you're like me, you probably coded along with a teacher.
However, when it comes to your turn to create something from the scratch, it's as though the brain is blank.
Now, the first thing you'd definitely see online when you browse how to be a programming problem solver is - *"Break down the problem into smaller chunks" *and then "Create a pseudo code for the problems"
And that's it.
So what happens after breaking it down to smaller problem?
That next step is the bridge that many struggle to cross over, and some end up giving up on programming in general.
Expert coders may not even realize when they finally grasped the concepts and how the problem solving finally clicked for them.
That's why they probably don't know how to break down the practical steps in details
I was stuck in this wormhole for the longest of times. Until I had this eureka moment.
The truth is...
"The biggest block to coding from scratch is knowing the particular syntax that you should use for the scenario. The exact logic that can work for the problem you want to solve."
Before we proceed, this article is for people who've grasped the basic terminologies of HTML, CSS and JavaScript. It doesn't cover explanations about those concepts. If you're a total beginner, I recommend starting here
Okay, let's dive into practical examples.
Suppose you get this exercise -
"Write a program that returns true is the sum of 2 integers equals to 100."
Best practices suggest you start with a pseudo-code
It means our program will accept 2 numbers as parameters
Add the two numbers in the parameters
If both equal to 100, return true
So at this point, if you've not mastered the core JavaScript building blocks, it will be difficult to know the very first step to take
Step 1. - Knowing the concept to use
This is why the first question to ask yourself is this 👇
What code in JavaScript accepts 2 parameters, that you can call on to execute a function?
That gives you Function
So we have to create a function that accepts 2 parameters
function isSum100 (x, y) {

  // Code goes in here

}
Step 2. - Using the right operator
The next question is this...
What method in JavaScript adds two numbers together?
You have the + maths operator. And that's what we'll add next
function isSum100 (x, y) {

  return x + y

}
Step 3. - Conditionals
Okay, but remember, there is a condition.
We have to check if adding both equals 100
And here comes the conditional statement -
function isSum100 (x, y) {

  if ( x + y === 100) {

   return true

  }

}
And that's it.
Step 4. - if/else statements
We can actually go a step further to add a statement in case both don't equal 100.
That's where our else statement comes in
function isSum100 (x, y) {

  if ( x + y === 100) {

   return true

} else {

return 'Numbers do not equal to 100'

}
}
Step 5. - Execute the program
Now, it's time to call the function
IsSum100(20,80)

console.log(isSum100(20,80))
And that's it. We have successfully solved a simple problem using JavaScript.
How about manipulating the DOM?
Let's say you want to create a form that accepts a text from an input. Then it should be displayed on another section of the webpage
How do you go about this?
Let's use this form as an example -
HTML markup
<!DOCTYPE html>
<html lang="en">
  <head>
    <meta charset="UTF-8" />
    <meta http-equiv="X-UA-Compatible" content="IE=edge" />
    <meta name="viewport" content="width=device-width, initial-scale=1.0" />
    <link rel="stylesheet" href="style.css" />
    <title>Scheduled task</title>
  </head>
  <body>
    <form class="form">
      <label for="form-name">Tasks for today</label>
      <input type="text" name="form-name" id="form-name" />
      <button id="form-submit">submit</button>
    </form>

    <section>
      <h4>Scheduled items</h4>
      <ul class="list-container">
        <li>Create html template</li>
      </ul>
    </section>
  </body>
</html>
CSS markup
body {
  font-family: "Segoe UI", Tahoma, Geneva, Verdana, sans-serif;
}

.form label {
  display: block;
  text-transform: capitalize;
  font-weight: bold;
  padding-bottom: 10px;
  padding-top: 20px;
}

#form-name {
  padding: 10px 40px 10px 5px;
  border: 2px solid grey;
  border-radius: 10px;
}

#form-name:focus {
  outline: none;


#form-submit {
  background-color: azure;
  color: black;
  padding: 10px;
  border: none;
  box-shadow: 4px 1px 10px 2px whitesmoke;
  cursor: pointer;
  text-transform: capitalize;
  font-weight: 600;
}
If you open it on your browser, it should look like this -
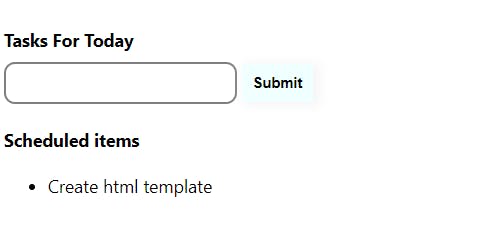
Now, if you want to take any content in this form input and display it as part of the list items, there are 3 factors to consider.
Finding the particular element
Accessing the content from the input
Displaying it as part of the list item
Sounds easy right?
Maybe. So what are the processes you're supposed to undertake to make this work?
FIRST STAGE - Accessing the Form
The question to ask is -
How do I access the JavaScript element from the HTML file itself? (Bold and italics)
So after you've set up your JavaScript file to the html, and you want to interact with both the html and CSS file, you use the DOM - Document object model
If you want to refresh your memory about this, go here
There are several methods to access the elements. That's where selectors come in. Be it class selectors or id selectors.
In this tutorial, we will be using the queryselector() and getElementById methods, you can access the particular element you want from the HTML file in the Javascript file.
Learn more about querySelectors orgetElementById
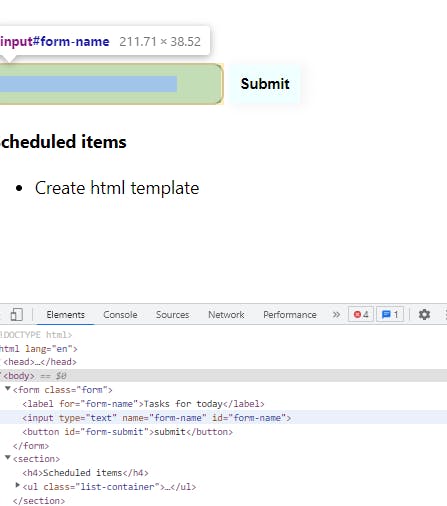
In our case, what we need is the form input with the id of 'form-name'
Using document.querySelector(), you can grab this particular element with the id of "formName"
Then save it to this variable. This is the code you can use -
const formName = document.querySelector("#form-name")
SECOND STAGE - Adding Event listeners
In the first stage, you learnt how to get the element from the HTML file by using selectors.
Now that you've accessed the element from the HTML file, what do you do with that?
The content of the input can't transport itself from the form.
There needs to be an action that prompts the movement.
So what actions are those?
In this case, you will want the content from the form to display on the other section when you click something on the screen
What methods are available for this situation?
This is another place you have to remember the specific syntax of the language that should work for this situation.
For JavaScript, there is the addEventListener() method of event target.
The addEventListener() method of the EventTarget interface sets up a function that will be called whenever the specified event is delivered to the target (MDN). Read more about this here
However, what we'll be looking for in our practice is specifically the onClick type.
Now how do you make this property to work?
First, the event needs to be handled on an element on the page. And that's the button.
What you're targeting in this situation is this...
Every time the button is clicked, it should collect the content in the form and display them as part of the list items.
This means we have to add the onClick eventListener on the button to proceed with this functionality.
There are 3 different methods to use the eventListener.
However, for the purpose of this article, let's stick with the the function method
If you want to learn more about the other eventListeners method of execution, you can check this out later
The function eventListener to be used accept 2 parameters -
The event to be handled,
A callback function.
Now let's work on this.
So, you can select the button on the html file using the getElementById method and save to a variable
const formSubmit = document.getElementById("form-submit")
Now, here is how to add the event listener
formSubmit.addEventListener("click",  function(){
  return // the lines of code to work

}
The above code is the skeleton of the event listener we want to run.
So if you recall functions, it's how you execute commands in JavaScript
So the function you'll add in the event listener will be the actions to be executed whenever the event action runs. In this sample case, it's the click.
Now that you've crossed this threshold, recall that you've saved the input itself to a variable named formName
What you have access to in this formName is the input itself. You don't have access to the content within the input
So how do you access the content within the form input itself?
The syntax for that is value.
So to access the content of the input, you'd have to get the formName.value
Perfect. Now that you've been able to get access to the input, let's move onto the final stage
THIRD STAGE - Functionality of the code
From stage 2, you learnt that after selecting element from the HTML file, you want an action to take place. And that's what we achieved with the eventListener.
The rest of the code for this practice will be within the eventListener scope
The third stage will be for the form to finally reflect as part of the list items.
Note that in the HTML form, there is the ul element with a Child element
And you want to add the content of the form input to be one of the list items
So, selecting this ul from the HTML file, you'll use the id selector to access this file
const listContainer = document.getElementById('list-container'')
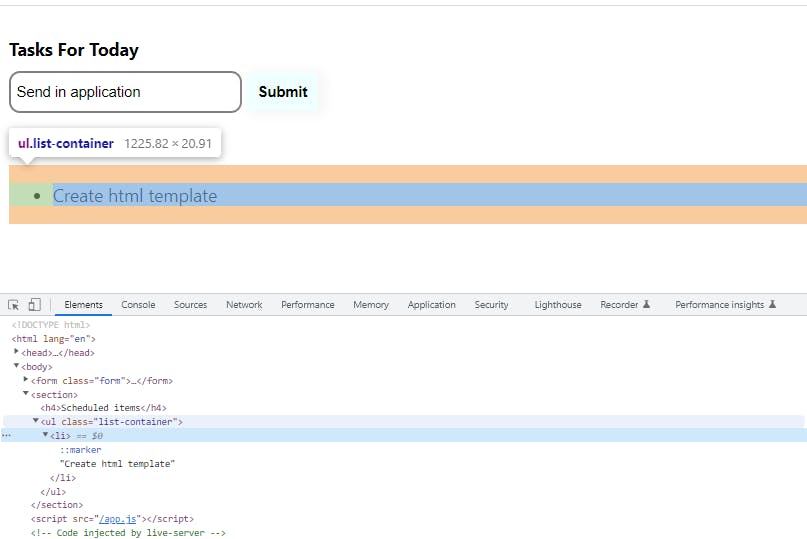
Here is the list container -
Now, to add the value from the form input (which is saved under the variable - formName) as part of the list items, we need a method that adds to the list.
Using another DOM transversing concepts, there is the appendChild() method. This basically adds a child element to the selected element
Our plan is to add the value from the formName to be a child Element of the listContainer
Remember, we just can't add the formName input itself as the child element.
We need the value from the formName input.
So, what we should do is to add the formName value to the li
To make this easier to follow, let's save this under a new variable -
const listItem = formName.value
However, remember that this is a list item.
So it needs to be wrapped around a list element, and that is the li element.
So first of all, we need to create the li element and save it to a variable
const liElement = document.createElement("li")
Now to add the content from the form which was saved to the listItem variable to the liElement, we need to create a nodelist. Go here to find out more about nodelist
So, let's create the code to be able to understand this better
liElement.appendChild(document.createTextNode(listItem))
Then we just need to append the liElement to be a child of listContainerusing the appendChild() method
So here is the code for that -
listContainer.appendChild(liElement)
And there you have it. Now, anytime you click on the button, the contents from the input reflects as part of the listItems.
At this stage, your code should look like this 👇
//DEFINE GLOBAL VARIABLES
// form input
const formName = document.querySelector("#form-name");

// form button
const formSubmit = document.getElementById("form-submit");

// ul for the list items
const listContainer = document.querySelector(".list-container");


// event listener
formSubmit.addEventListener("click", function () {
  // value of the input from the form
  const listItem = formName.value;

  // creating li element
  const liElement = document.createElement("li");

  // append the newly created list item to the liElement
  liElement.appendChild(document.createTextNode(listItem));

  // append the liElement to the list Container
  listContainer.appendChild(liElement);
});
**Now, this is the very basics. **
Going a step further
There are 3 bugs with the programme we just built.
BUG 1 - Preventing event default
Inside the form tag, the button always works as a submit button. So anytime we click on it, it appends it as part of the list.
However, it automatically submits and reloads the page.
And that's a result of the event method. Read more about this here
In order to stop this, we just need to prevent the default role of the button so we can remain on the same webpage without reloading.
So you simply need to add e in the parameter of the function
And add the e.preventDefault() of code 👇
formSubmit.addEventListener("click", function (e) {
  e.preventDefault()
  const listItem = formName.value;
  const liElement = document.createElement("li");
  liElement.appendChild(document.createTextNode(listItem));
  listContainer.appendChild(liElement);
});
BUG 2 - Clearing the input
Notice that after clicking the submit button, the text in the input remains there.
That is not a good experience for users.
So the best thing is for us to find a way to clear the input after we've appended the newly created list items
The process is easy. We just need to set the input to an empty string
formSubmit.addEventListener("click", function (e) {
  e.preventDefault();
  const listItem = formName.value;
  const liElement = document.createElement("li");
  liElement.appendChild(document.createTextNode(listItem));
  listContainer.appendChild(liElement);

  // newly added line of code
  formName.value = "";
});
BUG 3 - Form validation
What happens when nothing is written on the input leaving its value as empty?
If you notice in the video below, the list keeps adding empty items because that's exactly the function we told it to do.
Here is where form validation is important
How do we confirm that the form actually has any text inside, or whether it's empty
This is where we think of the logic that checks the conditional
So, you ask yourself, what is the syntax of creating a conditional logic in JavaScript?
That's where the if statement comes in
// pseudo-code
So (if (formName.value) === empty string) {
Alert something
} else {
Take the value and display it here
}
In our code it will look something like this -
formSubmit.addEventListener("click", function (e) {
  e.preventDefault();
  const listItem = formName.value;
  const liElement = document.createElement("li");

// Check for conditional
  if (listItem === "") {
    alert("I am empty");
  } else {
    liElement.appendChild(document.createTextNode(listItem));
    listContainer.appendChild(liElement);
    formName.value = "";
  }
});
This is basic validation.
Your final form should look like this 👇
Conclusion
If there's something I've learnt from learning programming, it is that computers are ridiculously dumb. It regurgitates the exact command you give it.
Hence, the reason to breakdown problems to the simplest form and solve them practically
Hopefully, this article has shed light on how you can approach breaking down problems, applying JavaScript concepts to your program and saying goodbye to tutorial hell.
If you want more content like this, you can subscribe to my newsletter to be the first to know whenever I post a new article